FFmpeg: DNxHD & DNxHR MXF Proxies and Optimized Media
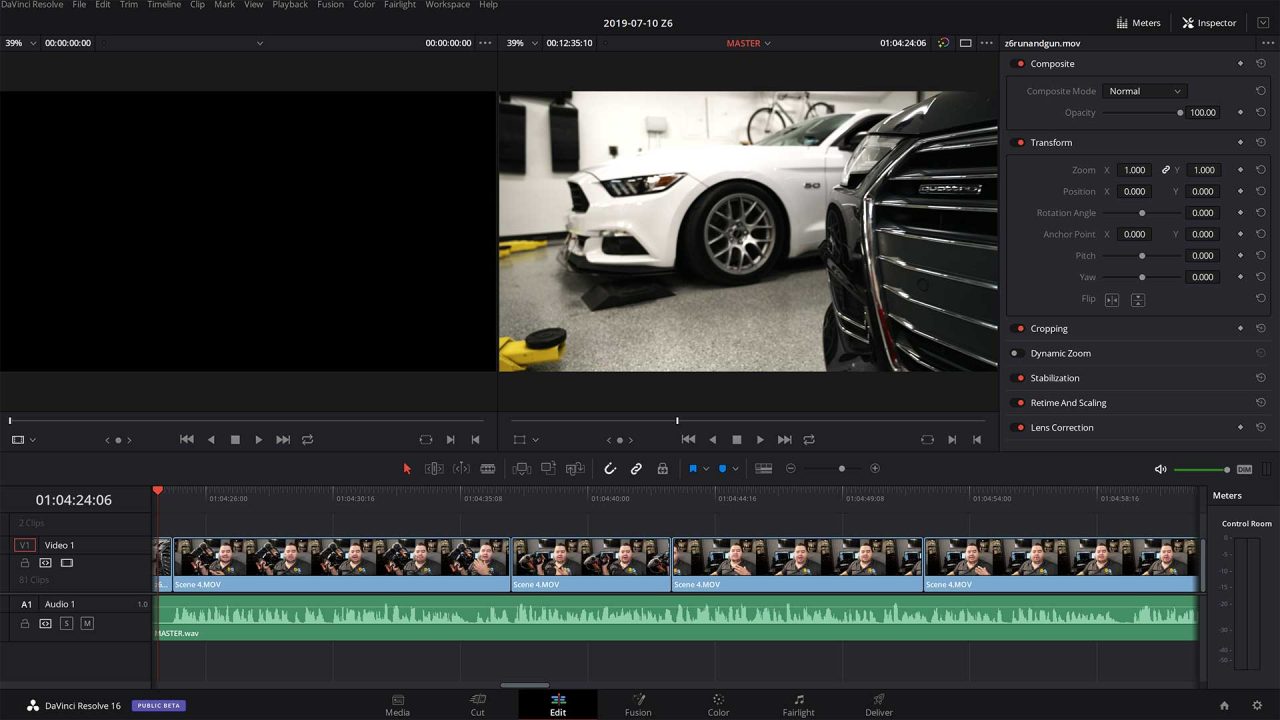
Choppy playback easy fix with FFmpeg and DNxHD/DNxHR in Material Exchange Format (MXF). Adobe Premiere, Avid Media Composer, and Davinci Resolve can experience choppiness, stuttering, and even crashes. Fix poor performance in H.264, H.265 codecs found in MKV, MP4, FLV, F4V, EVO, ASF, 3GP, 3G2, MOV, and AVI containers. Proxies and optimized media formats are easy with FFmpeg transcoding!
- The Problem is Your Codec
- FFmpeg to the Rescue
- Getting Started With FFmpeg
- Let’s Transcode Our First Proxy
- Deep Drive: DNxHR and FFmpeg Transcoding
The Problem is Your Codec
If you’ve ever tried to edit H.264 video, especially 4K you know it can be a stuttering choppy pain! I’ve even seen crashes. Many consumer cameras only output to formats suited for content delivery (i.e. H.264, H.265, etc..). These codecs are a burden for even powerful workstations to process. How do you solve this?
You could transcode, “render” or “optimize” it with your Non-Linear Editing (NLE) system. Use a low resolution and bit rate with a friendly codec. Then use the result as a lightweight proxy for editing, but at delivery use the original to transcode the final product. Many NLEs even have a built-in workflow that does this. Another preference may be to convert to an NLE friendly codec/format like DNxHD. Then you can just edit with that and not use a proxy at all.
Unfortunately these NLE applications aren’t always great at maximizing system resources. They often have very limited codec options without added plugins. Furthermore not all these editors support a simple way to transcode on a remote system. Remote transcoding is great to free up your workstation or edit bay while a server whirls away.
FFmpeg to the Rescue
This is where FFmpeg comes in handy. This transcoder is open source and able to handle almost any codec and use case. Its scope is far beyond proxies and optimized formats for NLEs, it is a swiss army knife. It’s also pretty quick when it comes to many common codecs and render times. The problem is that FFmpeg is daunting. If you run it for the first time it will feel like some kind of evil experiment in pissing you off. It really doesn’t have to be!
There are GUI options like Handbrake, which will configure FFmpeg for you. These GUIs are appealing, but have a side effect. You often don’t learn how anything works, because they tend to have decent presets. So while you might feel happy with the results, you may be settling short of optimal.
How Hard Can it Be?
If you’re technical you can learn each major codec in about an hour or two a piece. This includes some testing and validating that you understand whats going on. This may seem like a lot, but the results and optimization are worth it.
Note: Some codecs are poorly documented, DNxHR is one of those codecs. I had to do quite a lot of research and it’s largely why I wrote this article.
Today I’m gonna teach you one codec, DNxHR. It is especially useful for PC users and is overall a great codec. Mac users may want to research ProRes, but can still benefit from understanding how we’re using FFmpeg in this article. You will also likely encounter DNxHR again and it’s good to know.
Getting Started With FFmpeg
First you need to download FFmpeg, here is also a direct link to their builds for Windows, Linux and Mac. Installing is pretty straight forward if you’re familiar with your OS. I’m doing this on Linux.
I downloaded static binaries and symlinked them so they were in my path. You could also just execute ffmpeg directly (i.e. /home/someuser/ffmpeg-version/./ffmpeg) on Linux. In Windows you could execute FFmpeg via the Command Prompt by navigating to its path with “cd” and typing “ffmpeg.exe”.
Next let’s find the file we need to convert. You might have your data stored on local storage or network shares. In my case I use NFS storage when editing. This storage runs from my server, which I also use with FFmpeg for transcoding. This is handy because the files are already on the server and it frees my workstation.
Here is where my file is located:
[root@compute2 videos]# pwd
/home/storage/volume4/videos
[root@compute2 videos]# ll -h
total 17G
drwxr-xr-x.  4 storage storage   73 Jul  6 03:00 Databases
drwxr-xr-x. 12 storage storage 4.0K Jun 16 14:19 Distribution
drwxr-xr-x.  2 storage storage 8.0K Jul  7 22:56 Finished
-rwxr-xr-x.  1 storage storage  15G Jul 15 01:51 input.mxf
-rwxr-xr-x.  1 storage storage 1.9M Jul 14 23:44 MASTER.aaf
-rwxr-xr-x.  1 storage storage 113M Jul 14 23:43 MASTER.wav
drwxr-xr-x. 27 storage storage 4.0K Jul 11 01:23 Projects
drwxr-xr-x. 90 storage storage 4.0K Jul 15 17:34 Sources
-rwxr-xr-x.  1 storage storage 1.8G Jul 15 01:58 testfile.mp4
[root@compute2 videos]#
As you can see I have a file called testfile.mp4 which we will be working with today. Imagine I was just trying to use it with my NLE and it was super choppy. We should find out why first. The mp4 container can house many formats, check out this matrix for more details. Here are some common ones: HEVC/MPEG-H Part 2/H.265, MPEG-2 Part 2, MPEG-4 ASP, H.264/MPEG-4 AVC, and H.263.
Why Doesn’t This File Play Nice?
We can use FFmpeg to profile the file and find out. It’s quite easy to inspect it for audio/video information like so:
[root@compute2 videos]# ffmpeg -i testfile.mp4 -hide_banner
Input #0, mov,mp4,m4a,3gp,3g2,mj2, from 'testfile.mp4':
  Metadata:
    major_brand     : isom
    minor_version   : 512
    compatible_brands: isomiso2avc1mp41
    encoder         : Lavf58.20.100
  Duration: 00:03:01.29, start: 0.000000, bitrate: 81440 kb/s
    Stream #0:0(und): Video: h264 (High 4:2:2) (avc1 / 0x31637661), yuv422p10le, 3840x2160 [SAR 1:1 DAR 16:9], 81186 kb/s, 23.98 fps, 23.98 tbr, 24k tbn, 47.95 tbc (default)
    Metadata:
      handler_name    : VideoHandler
      timecode        : 01:00:00:00
    Stream #0:1(und): Audio: aac (LC) (mp4a / 0x6134706D), 48000 Hz, stereo, fltp, 258 kb/s (default)
    Metadata:
      handler_name    : SoundHandler
    Stream #0:2(eng): Data: none (tmcd / 0x64636D74)
    Metadata:
      handler_name    : TimeCodeHandler
      timecode        : 01:00:00:00
At least one output file must be specified
[root@compute2 videos]#
These options are fairly simple. The ‘i’ flag specifies the input file while ‘-hide_banner’ quiets down some of the unnecessary build information.
Video Stream Information
Take a look at the section that says Stream #0. You can see it says Video: h264 (High 4:2:2) … yuv422p10le, 3840×2160 … 81186 kb/s … 23.98 fps which is all the video information we need. Let’s break that up:
| Value | Description |
| h264 | Our codec is H.264, known to perform poorly in NLEs. |
| High 4:2:2 | 4:2:2 chroma subsampling and High H.264 profile. |
| yuv422p10le | Our file has 10-bit color depth, this is above usual 8-bit. |
| 3840×2160 | Video resolution was found to be UHD 4K. |
| 81186 kb/s | This is our bit rate, in this case about 81.2 Mbps. |
| 23.98 fps | The frame rate is NTSC Film at 23.976. |
Now we understand that H.264 is bogging us down. We also learned the other parameters of the file which we can use later in the article to convert to optimized media instead of making a proxy. We will make sure to not undershoot these values when doing so later, to preserve quality. Of course quality doesn’t matter much with a proxy.
Audio Stream Information
We should also note the audio. Note the section that says Stream #0:1 … Audio: aac (LC) … 48000 Hz … stereo … 258 kb/s this is the audio codec info.
| Value | Description |
| aac (LC) | Our audio codec is AAC LC, a compressed format. |
| 48000 Hz | The sample rate of our audio is 48KHz. |
| stereo | Should be clear this means we have a stereo stream. |
| 256 kb/s | Our audio bit rate is 256 kbps. |
Let’s Transcode Our First Proxy
What is a proxy? A proxy is a low bandwidth, low resolution, crappy version of the true source media. It is just an identical copy that you can use for quick editing. After all even with a dedicated timeline monitor your NLE displays a small image. Usually around 1/4 of the screen is actually used. There is no reason to use a high resolution and definition proxy.
To make a proxy we’re going to disregard the quality of the source. Our goal is to just make something small. I personally like the DNxHR codec which is basically a new version of DNxHD, but we can get into the specifics later.
DNxHR is a very NLE friendly codec. For proxies I like to set resolution to 720p, 4:2:2 8-bit pixel format, which means a Low Bandwidth (LB) profile. In our case our source is 81.2Mbps so the result we make should be faster and MUCH smaller!
Transcoding to DNxHR With FFmpeg
With FFmpeg ready to go we will make our proxy:
ffmpeg -i testfile.mp4 -c:v dnxhd -vf "scale=1280:720,fps=24000/1001,format=yuv422p" -profile:v dnxhr_lb -c:a pcm_s16le -ar 48000 -hide_banner testfile.mxf
Above is the command that I ran to generate my DNxHR proxy. That got scary fast, but don’t worry I’m going to explain this command for you.
| Flag / Option | Description |
| -i testfile.mp4 | Our source file can be nearly any codec. |
| -c:v dnxhd | This is the encoder DNxHD, used for DNxHR. |
| -vf | Specifies that video filter settings follow. |
| scale=1280×720 | This is setting 720p resolution to scale down the video. |
| fps=24000/1001 | Setting the frame rate to NTSC Film 23.976 to match. |
| format=yuv422p | Changing to 4:2:2 8-bit pixel format in lieu of 10-bit. |
| -profile:v dnxhr_lb | We’re telling it we want DNxHR LB codec. |
| -c:a pcm_s16le | Convert our compressed audio to WAV 16-bit. |
| -ar 48000 | Convert audio to 48KHz as codec requires. (Optional) |
| -hide_banner | Hides some unnecessary build information. |
| testfile.mxf | This is the file name we will save to. |
This should make a little more sense now. In the next section I will explain the DNxHR codec and why some of these options were picked. For now let’s check out the results of our transcoding:
[root@compute2 videos]# ffmpeg -i testfile.mp4 -c:v dnxhd -vf "scale=1280:720,fps=24000/1001,format=yuv422p" -profile:v dnxhr_lb -c:a pcm_s16le -ar 48000 -hide_banner testfile.mxf
Input #0, mov,mp4,m4a,3gp,3g2,mj2, from 'testfile.mp4':
  Metadata:
    major_brand     : isom
    minor_version   : 512
    compatible_brands: isomiso2avc1mp41
    encoder         : Lavf58.20.100
  Duration: 00:03:01.29, start: 0.000000, bitrate: 81440 kb/s
    Stream #0:0(und): Video: h264 (High 4:2:2) (avc1 / 0x31637661), yuv422p10le, 3840x2160 [SAR 1:1 DAR 16:9], 81186 kb/s, 23.98 fps, 23.98 tbr, 24k tbn, 47.95 tbc (default)
    Metadata:
      handler_name    : VideoHandler
      timecode        : 01:00:00:00
    Stream #0:1(und): Audio: aac (LC) (mp4a / 0x6134706D), 48000 Hz, stereo, fltp, 258 kb/s (default)
    Metadata:
      handler_name    : SoundHandler
    Stream #0:2(eng): Data: none (tmcd / 0x64636D74)
    Metadata:
      handler_name    : TimeCodeHandler
      timecode        : 01:00:00:00
Stream mapping:
  Stream #0:0 -> #0:0 (h264 (native) -> dnxhd (native))
  Stream #0:1 -> #0:1 (aac (native) -> pcm_s16le (native))
Press [q] to stop, [?] for help
Output #0, mxf, to 'testfile.mxf':
  Metadata:
    major_brand     : isom
    minor_version   : 512
    compatible_brands: isomiso2avc1mp41
    encoder         : Lavf58.20.100
    Stream #0:0(und): Video: dnxhd (DNXHR LB) (AVdh / 0x68645641), yuv422p, 1280x720 [SAR 1:1 DAR 16:9], q=2-1024, 200 kb/s, 23.98 fps, 23.98 tbn, 23.98 tbc (default)
    Metadata:
      handler_name    : VideoHandler
      timecode        : 01:00:00:00
      encoder         : Lavc58.35.100 dnxhd
    Stream #0:1(und): Audio: pcm_s16le, 48000 Hz, stereo, s16, 1536 kb/s (default)
    Metadata:
      handler_name    : SoundHandler
      encoder         : Lavc58.35.100 pcm_s16le
frame= 4346 fps= 76 q=7.0 Lsize=  386801kB time=00:03:01.26 bitrate=17480.5kbits/s speed=3.19x
video:347680kB audio:33988kB subtitle:0kB other streams:0kB global headers:0kB muxing overhead: 1.344898%
[root@compute2 videos]# ll -h
total 17G
drwxr-xr-x.  4 storage storage   73 Jul  6 03:00 Databases
drwxr-xr-x. 12 storage storage 4.0K Jun 16 14:19 Distribution
drwxr-xr-x.  2 storage storage 8.0K Jul  7 22:56 Finished
-rwxr-xr-x.  1 storage storage  15G Jul 15 01:51 input.mxf
-rwxr-xr-x.  1 storage storage 1.9M Jul 14 23:44 MASTER.aaf
-rwxr-xr-x.  1 storage storage 113M Jul 14 23:43 MASTER.wav
drwxr-xr-x. 27 storage storage 4.0K Jul 11 01:23 Projects
drwxr-xr-x. 90 storage storage 4.0K Jul 16 23:08 Sources
-rwxr-xr-x.  1 storage storage 1.8G Jul 15 01:58 testfile.mp4
-rwxr-xr-x.  1 storage storage 378M Jul 17 00:30 testfile.mxf
[root@compute2 videos]#
DNxHR Proxy vs H.264 Original Analysis
Not bad! We have a new file called testfile.mxf and it is 378M while the original file testfile.mp4 is 1.8G. It was created at 3.19x of real time, at 76 fps, pretty quick! The result is a 720p 8-bit DNxHR proxy that we can use with our favorite NLE. You should find that the performance is much better when editing with these DNxHR encoded proxies.

The difference visually might look huge, but it’s not a big deal inside the NLE for editing purposes. Once you have cut up your video, you can simply re-link to the original high quality files for the final export transcoding. It’s just as easy as that, no more choppiness while editing!
Deep Drive: DNxHR and FFmpeg Transcoding
While you could simply copy and paste the command line from the section above, that’s no better than just using some presets in your NLE GUI. Let’s talk about what we’re actually doing here.
DNxHD vs DNxHR
You probably noticed we were talking about the DNxHR codec, but specified DNxHD in our FFmpeg command as the encoder. FFmpeg uses the older DNxHD codec if you do not specify a DNxHR profile. This is why we added the “dnxhr_lb” bit. This means we told it to actually use the DNxHR Low Bandwidth 8-bit 4:2:2 profile to transcode. It’s a little quirky, but this is how FFmpeg implemented the two codecs. I’m told their logic was that DNxHR is meant to be backwards compatible with DNxHD.
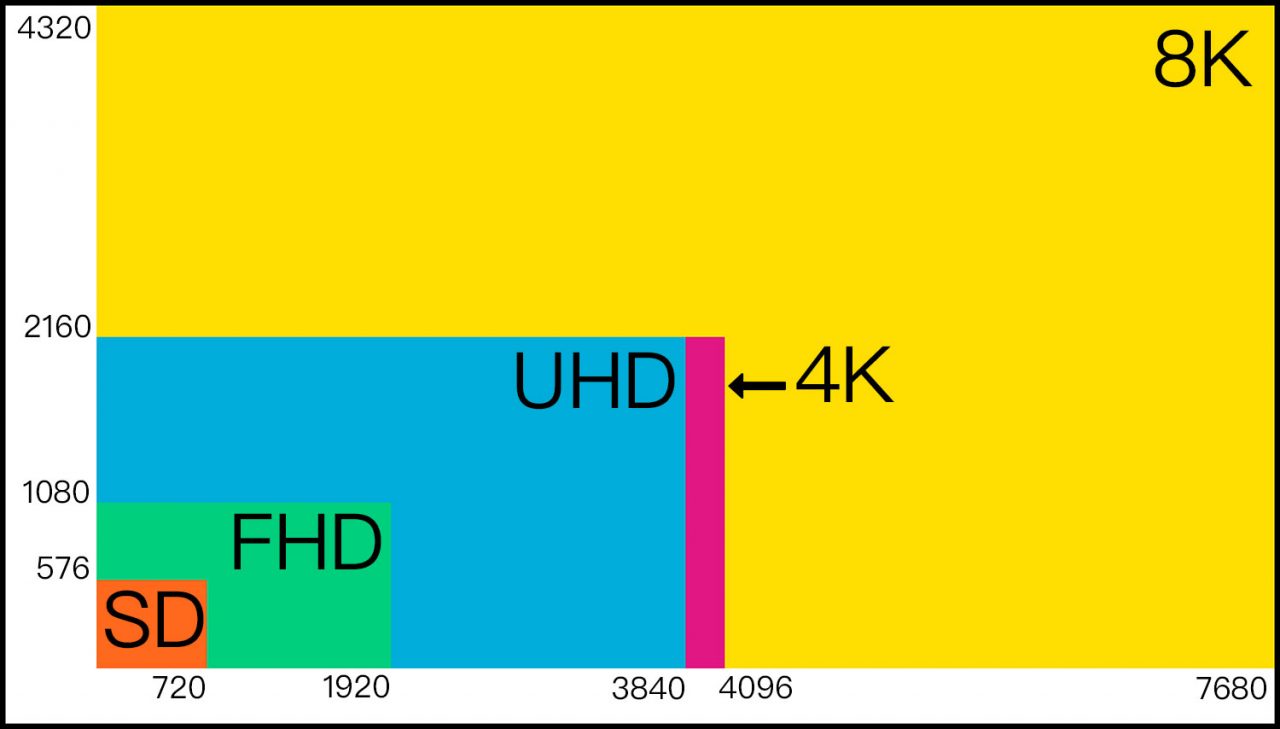
DNxHR is a newer codec than DNxHD. It allows Digital Cinema Initiatives (DCI) true 4K (4096×2160) and the more common consumer Ultra HD (UHD) “4K” (3840×2160) resolutions. For color space/bit depth it supports 4:2:2, 4:4:4, 8-bit, 10-bit and 12-bit. Like the older codec DNxHR is commonly found inside of a Material Exchange Format (MXF) container.
A great aspect to the DNxHR codec is that it treats resolution and framerate independently. This makes the codec much easier to use. The older DNxHD was very limiting and complicated to use with FFmpeg. Using FFmpeg you had to perfectly match up the pixel format, frame rate, and resolution to a specific bitrate. Get one parameter wrong and it will error out! DNxHR fixes all of this and makes things very simple.
Compatible Resolutions & Frame Rates
As I mentioned DNxHR is resolution independent. You can use all the resolutions from 256×120 all the way up to 4096×2160, per the codec specifications. Interestingly enough I was able to make FFmpeg transcode to 6K WS with my build, but not 6K HD which caused a segfault. I’m using ffmpeg version 4.1.3-static to do these tests, but 6K is definitely out of spec.
Note: I wouldn’t recommend doing anything out of codec spec unless you’re just testing like me.
When it comes to frame rates the answer is that it is independent of resolution. Documentation here is a bit lacking. Avid has this document available as a pdf. I was able to test the following settings successfully:
| FPS Type | FFmpeg Setting |
| 23.976 (24p NTSC) | fps=24000/1001 or alias fps=ntsc-film |
| 24p | fps=24/1 or alias fps=film |
| 25p (PAL) | fps=25/1 or alias fps=pal |
| 29.97p (NTSC) | fps=30000/1001 or alias fps=ntsc |
| 30p | fps=30/1 no known alias |
| 47.95p | fps=48000/1001 no known alias |
| 48p | fps=48/1 no known alias |
| 50p | fps=50/1 no known alias |
| 59.94p | fps=60000/1001 no known alias |
| 60p | fps=60/1 no known alias |
There may be other frame rates, but I wasn’t able to get 240/1 or 120/1 to work, which means for high FPS this may be an issue depending on your workflow. FFmpeg could slow the video and audio down using “setpts” and “atempo” options.
Note: To help you research, these two settings work in opposite directions as far as their multiple. Both need to be adjusted if you’re keeping the audio track.
Compatible Chroma Subsampling & Color Depth
DNxHR makes selecting a pixel format easy. There isn’t much to mess with, by default all profiles support 4:2:2 with the exception of DNxHR 444 which supports 4:4:4. See? Nothing to think about unless you have 4:4:4 sources.
How about bit depth for color? Same thing. Everything is 8-bit, except for DNxHR HQX and DNxHR 444 which will go up to 12-bit by codec spec. So if you shoot 10-bit 4:2:2 pick DNxHR HQX and if it’s 4:4:4 choose DNxHR 444. Same thing for 12-bit, just select a slightly different pixel format. If you’re just shooting 4:2:0 or 4:2:2 with 8-bit, any of the others will work for you depending on data rate requirements, but HQX and 444 are unnecessary.
| Codec Profile | Bit Depth | Chroma SS | Compression | FFmpeg Setting |
| DNxHR LB | 8-bit Color | 4:2:2 | 22 to 1 CR | Filter: yuv422p Profile: dnxhr_lb |
| DNxHR SQ | 8-bit Color | 4:2:2 | 7 to 1 CR | Filter: yuv422p Profile: dnxhr_sq |
| DNxHR HQ | 8-bit Color | 4:2:2 | 4.5 to 1 CR | Filter: yuv422p Profile: dnxhr_hq |
| DNxHR HQX | <= 12-bit Color | 4:2:2 | 5.5 to 1 CR | Filter: yuv422p10le Filter: yuv422p12le Profile: dnxhr_hqx |
| DNxHR 444 | <= 12-bit Color | 4:4:4 | 4.5 to 1 CR | Filter: yuv444p10le Filter: yuv444p12le Profile: dnxhr_444 |
Note: yuv422p10le vs yuv422p12le is 10 vs 12 bit, same goes for 444.
Dealing With Audio Streams
Let’s discuss is how to keep your audio stream with your transcoding. The DNxHR codec in FFmpeg supports PCM audio in a Waveform Audio File Format (WAVE/WAV) container in 16-bit and 24-bit, but only at 48KHz. This is done via the pcm_s16le and pcm_s24le audio codec and “ar” FFmpeg options. You can see this in our command:
-c:a pcm_s16le -ar 48000
That statement tells FFmpeg to use 16-bit PCM audio codec in a WAV/WAVE container and convert to 48KHz. Now if you scroll up to where we were reviewing the Audio Stream Information, you can see the source was already 48KHz. I included the option to convert to 48KHz in case some of you needed it, otherwise you would get an error. It is not necessary in cases where your media is already 48KHz like mine.
Many people record audio to a separate device and use in-camera audio for synchronization purposes only if not using a timecode workflow. This is how I prefer to work. In my case when I have suboptimal codec source media I’ll just use 16-bit for either the proxy or the optimized media, because it doesn’t matter. My audio is a separate file.
Note: If you have very high quality audio in your source and plan to use the transcoding for more than a proxy, I would recommend using 24-bit version pcm_s24le.
DNxHR Data Rates
You might be wondering what the data rates are like for DNxHR. This the final piece in our puzzle. If you’re going to be generating optimized media, media for exchange with others, and not a proxy; You probably want to keep the bitrate and overall quality from being nuked by compression. In our case if you remember the file had 81.2 Mbps video bit rate.
Here are some data bit rates for common resolutions and frame rates:
| Profile | 24p | 30p | 60p |
| LB | 1920×1080 – 36 Mbps 2048×1080 – 39 Mbps 3840×2160 – 144 Mbps 4096×2160 – 153 Mbps | 1920×1080 – 45 Mbps 2048×1080 – 48 Mbps 3840×2160 – 180 Mbps 4096×2160 – 192 Mbps | 1920×1080 – 91 Mbps 2048×1080 – 96 Mbps 3840×2160 – 359 Mbps 4096×2160 – 383 Mbps |
| SQ | 1920×1080 – 116 Mbps 2048×1080 – 124 Mbps 3840×2160 – 462 Mbps 4096×2160 – 493 Mbps | 1920×1080 – 146 Mbps 2048×1080 – 155 Mbps 3840×2160 – 578 Mbps 4096×2160 – 616 Mbps | 1920×1080 – 291 Mbps 2048×1080 – 310 Mbps 3840×2160 – 1155 Mbps 4096×2160 – 1232 Mbps |
| HQ | 1920×1080 – 176 Mbps 2048×1080 – 188 Mbps 3840×2160 – 699 Mbps 4096×2160 – 746 Mbps | 1920×1080 – 220 Mbps 2048×1080 – 235 Mbps 3840×2160 – 874 Mbps 4096×2160 – 933 Mbps | 1920×1080 – 440 Mbps 2048×1080 – 470 Mbps 3840×2160 – 1749 Mbps 4096×2160 – 1865 Mbps |
| HQX | 1920×1080 – 176 Mbps 2048×1080 – 188 Mbps 3840×2160 – 699 Mbps 4096×2160 – 746 Mbps | 1920×1080 – 220 Mbps 2048×1080 – 235 Mbps 3840×2160 – 874 Mbps 4096×2160 – 933 Mbps | 1920×1080 – 440 Mbps 2048×1080 – 470 Mbps 3840×2160 – 1749 Mbps 4096×2160 – 1865 Mbps |
| 444 | 1920×1080 – 352 Mbps 2048×1080 – 376 Mbps 3840×2160 – 1399 Mbps 4096×2160 – 1492 Mbps | 1920×1080 – 440 Mbps 2048×1080 – 470 Mbps 3840×2160 – 1749 Mbps 4096×2160 – 1865 Mbps | 1920×1080 – 881 Mbps 2048×1080 – 940 Mbps 3840×2160 – 3497 Mbps 4096×2160 – 3730 Mbps |
If we decide that we want to transcode my source video to DNxHR of equal visual quality we need to consider its specifications again:
| Value | Description |
| h264 | Our codec is H.264, known to perform poorly in NLEs. |
| High 4:2:2 | 4:2:2 chroma subsampling and High H.264 profile. |
| yuv422p10le | Our file has 10-bit color depth, this is above usual 8-bit. |
| 3840×2160 | Video resolution was found to be UHD 4K. |
| 81186 kb/s | This is our bit rate, in this case about 81.2 Mbps. |
| 23.98 fps | The frame rate is NTSC Film at 23.976. |
| Value | Description |
| aac (LC) | Our audio codec is AAC LC, a compressed format. |
| 48000 Hz | The sample rate of our audio is 48KHz. |
| stereo | Should be clear this means we have a stereo stream. |
| 256 kb/s | Our audio bit rate is 256 kbps. |
Looking at the data we know the video is 3840×2160 UHD “4K”, 81.2 Mbps, 4:2:2 @ 10-bit pixel format, and 23.98 fps, with 48KHz audio. Because of the pixel format we know we need the DNxHR HQX profile. To keep our native resolution we can look at the large table above and see that at 24P (close to 23.98 NTSC) it should be somewhere around 699 Mbps for the video stream.
ffmpeg -i testfile.mp4 -c:v dnxhd -vf "scale=3840:2160,fps=ntsc-film,format=yuv422p10le" -profile:v dnxhr_hqx -c:a pcm_s16le -hide_banner testfile.mxf
That is going to generate a huge file. However, this file is going to give good performance in your NLE and is compatible across a lot of systems. That being said, it really demonstrates the benefit of proxies, check out the output:
[root@compute2 videos]# ffmpeg -i testfile.mp4 -c:v dnxhd -vf "scale=3840:2160,fps=ntsc-film,format=yuv422p10le" -profile:v dnxhr_hqx -c:a pcm_s16le -hide_banner testfile.mxf
Input #0, mov,mp4,m4a,3gp,3g2,mj2, from 'testfile.mp4':
  Metadata:
    major_brand     : isom
    minor_version   : 512
    compatible_brands: isomiso2avc1mp41
    encoder         : Lavf58.20.100
  Duration: 00:03:01.29, start: 0.000000, bitrate: 81440 kb/s
    Stream #0:0(und): Video: h264 (High 4:2:2) (avc1 / 0x31637661), yuv422p10le, 3840x2160 [SAR 1:1 DAR 16:9], 81186 kb/s, 23.98 fps, 23.98 tbr, 24k tbn, 47.95 tbc (default)
    Metadata:
      handler_name    : VideoHandler
      timecode        : 01:00:00:00
    Stream #0:1(und): Audio: aac (LC) (mp4a / 0x6134706D), 48000 Hz, stereo, fltp, 258 kb/s (default)
    Metadata:
      handler_name    : SoundHandler
    Stream #0:2(eng): Data: none (tmcd / 0x64636D74)
    Metadata:
      handler_name    : TimeCodeHandler
      timecode        : 01:00:00:00
Stream mapping:
  Stream #0:0 -> #0:0 (h264 (native) -> dnxhd (native))
  Stream #0:1 -> #0:1 (aac (native) -> pcm_s16le (native))
Press [q] to stop, [?] for help
Output #0, mxf, to 'testfile.mxf':
  Metadata:
    major_brand     : isom
    minor_version   : 512
    compatible_brands: isomiso2avc1mp41
    encoder         : Lavf58.20.100
    Stream #0:0(und): Video: dnxhd (DNXHR HQX) (AVdh / 0x68645641), yuv422p10le, 3840x2160 [SAR 1:1 DAR 16:9], q=2-1024, 200 kb/s, 23.98 fps, 23.98 tbn, 23.98 tbc (default)
    Metadata:
      handler_name    : VideoHandler
      timecode        : 01:00:00:00
      encoder         : Lavc58.35.100 dnxhd
    Stream #0:1(und): Audio: pcm_s16le, 48000 Hz, stereo, s16, 1536 kb/s (default)
    Metadata:
      handler_name    : SoundHandler
      encoder         : Lavc58.35.100 pcm_s16le
frame= 4346 fps= 64 q=1.0 Lsize=15493497kB time=00:03:01.26 bitrate=700188.6kbits/s speed=2.66x
video:15454376kB audio:33988kB subtitle:0kB other streams:0kB global headers:0kB muxing overhead: 0.033141%
[root@compute2 videos]# ls -alh
total 32G
drwxr-xr-x.  8 storage storage  268 Jul 18 01:16 .
drwxr-xr-x.  3 storage storage   20 Jul 10 02:26 ..
drwxr-xr-x.  4 storage storage   73 Jul  6 03:00 Databases
drwxr-xr-x. 12 storage storage 4.0K Jun 16 14:19 Distribution
-rwxr-xr-x.  1 storage storage  13K Oct 17  2017 .DS_Store
drwxr-xr-x.  2 storage storage 8.0K Jul  7 22:56 Finished
drwxr-xr-x.  4 storage storage  106 Jul  6 02:42 .gallery
-rwxr-xr-x.  1 storage storage  15G Jul 15 01:51 input.mxf
-rwxr-xr-x.  1 storage storage 1.9M Jul 14 23:44 MASTER.aaf
-rwxr-xr-x.  1 storage storage 113M Jul 14 23:43 MASTER.wav
drwxr-xr-x. 28 storage storage 4.0K Jul 17 21:01 Projects
drwxr-xr-x. 90 storage storage 4.0K Jul 16 23:08 Sources
-rwxr-xr-x.  1 storage storage 1.8G Jul 15 01:58 testfile.mp4
-rwxr-xr-x.  1 storage storage  15G Jul 18 01:17 testfile.mxf
[root@compute2 videos]#
As you can see the file size difference with our original is massive. We went from 1.8GB to a whopping 15G! Storage is the real deterrent to using such large files. If you’re working with H.264 sources I would highly recommend using proxies unless you need to share DNxHR with others (i.e. colorists). DNxHD and DNxHR make for great intermediate/mezzanine formats.
My gear captures DNxHR natively, so I actually have to store such large files. Proxies would just take up more space and even these large files perform very well on my workstation. However, I’m very lucky to have equipment capable of capturing and storing such data.
I hope this article was overall informative and you were able to get a little more familiar with FFmpeg and DNxHR!
Lou Logan’s post on Ask Ubuntu was a huge help in figuring out some of the codec quirks.
Note: All of this information is current as of 07/18/2019 and I did this with the following FFmpeg build:
ffmpeg version 4.1.3-static https://johnvansickle.com/ffmpeg/  Copyright (c) 2000-2019 the FFmpeg developers
  built with gcc 6.3.0 (Debian 6.3.0-18+deb9u1) 20170516
  configuration: --enable-gpl --enable-version3 --enable-static --disable-debug --disable-ffplay --disable-indev=sndio --disable-outdev=sndio --cc=gcc-6 --enable-fontconfig --enable-frei0r --enable-gnutls --enable-gmp --enable-gray --enable-libaom --enable-libfribidi --enable-libass --enable-libvmaf --enable-libfreetype --enable-libmp3lame --enable-libopencore-amrnb --enable-libopencore-amrwb --enable-libopenjpeg --enable-librubberband --enable-libsoxr --enable-libspeex --enable-libvorbis --enable-libopus --enable-libtheora --enable-libvidstab --enable-libvo-amrwbenc --enable-libvpx --enable-libwebp --enable-libx264 --enable-libx265 --enable-libxml2 --enable-libxvid --enable-libzvbi --enable-libzimg
  libavutil      56. 22.100 / 56. 22.100
  libavcodec     58. 35.100 / 58. 35.100
  libavformat    58. 20.100 / 58. 20.100
  libavdevice    58.  5.100 / 58.  5.100
  libavfilter     7. 40.101 /  7. 40.101
  libswscale      5.  3.100 /  5.  3.100
  libswresample   3.  3.100 /  3.  3.100
  libpostproc    55.  3.100 / 55.  3.100
Hyper fast Audio and Video encoder

No module named cElementTree yum update error

Nahimic: Uninstalling & Blocking MSI Bloatware
Deleting Files with Broken Windows File Permissions
About Author
dmitry
Add a Comment
You must be logged in to post a comment.