NFS on CentOS 7 & Windows 10 NFS Client Configuration
I just finished building a really nice Windows 10 home workstation to replace my aging and sluggish 2013 Mac Pro system. I store most of my data on CentOS 7 server with over 40TB of RAID backed storage volumes. From my Mac Pro I was able to use Netatalk which uses Apple’s AFP to access my data. Having switched to Windows I now needed either CIFS (Samba) or NFS.
I decided to give NFS a shot, since it was simple, higher performance (in theory) and easy to get going. I am using Windows 10 Pro 64-bit for my NFS client. I do not know if all editions of Windows 10 support NFS, I imagine “Home” probably does not. I do not know if there is a way to install it into other editions and that is beyond the scope of this article.
NFS Server Configuration on CentOS 7.4.1708 x86_64
First we need to pull in the packages that make NFS work and setup services to start automatically with our system. For this tutorial I’m assuming you are logged in as root. If not either use sudo or change to root login.
yum -y install nfs-utils nfs-utils-lib
systemctl enable rpcbind
systemctl enable nfs-server
systemctl enable nfs-lock
systemctl enable nfs-idmap
systemctl start rpcbind
systemctl start nfs-server
systemctl start nfs-lock
systemctl start nfs-idmap
Then we need to figure out what directories we want to share on the server. These will be our “exports” to our Windows 10 NFS client, the folders we want it to see on the server. I already have a user named “storage” on my server. This user contains all the data I wish to share with my Windows 10 NFS client. To ensure my storage user has the proper permissions and ownership I use the following helper script on a 5 minute cron job. This is only because I have other software writing things to several raid volumes inside my user’s directory. You just need to make sure your user (make one if needed) can access everything inside his directory. You do not have to use a helper script cron job, it’s just to give you an idea.
#!/bin/bash
chown -R storage. /home/storage
chmod 700 /home/storage
chmod -R 755 /home/storage/volume1
chmod -R 755 /home/storage/volume2
chmod -R 755 /home/storage/volume3
chmod -R 777 /home/storage/volume1/unsorted
We will now need to get the UID and GID of the user you plan to use, as you can see my user “storage” has a uid and gid of 1001:
# id -u storage && id -g storage
1001
1001
You will also need to get the IP address of your Windows 10 NFS client. You can do this from the Control panel or via ipconfig /all from the command line. Now we need to edit the exports file and add my user storage to it.
nano -w /etc/exports
Here is the configuration I wrote and saved:
/home/storage 192.168.1.249(rw,sync,root_squash,all_squash,anonuid=1001,anongid=1001)
This sets the export of /home/storage to my Windows client of 192.168.1.249. Notice I set the anonuid and anongid to 1001. Now we restart the service:
systemctl restart nfs-server
Before we begin to configure the Windows 10 client, lets ensure your firewall allows NFS and related communications. I use basic iptables on this server so my example will reflect that. However, if you prefer FirewallD, ConfigServer Firewall, etc… you can use this information to edit your particular system.
To begin with, for most firewalls, you will need to set static ports for relevant services. Edit the /etc/sysconfig/nfs and setup some manual ports:
LOCKD_TCPPORT=32803
LOCKD_UDPPORT=32769
MOUNTD_PORT=892
STATD_PORT=662
Now restart NFS or reboot the server and you should be able to see:
# rpcinfo -p
program vers proto   port  service
100000    4   tcp    111  portmapper
100000    3   tcp    111  portmapper
100000    2   tcp    111  portmapper
100000    4   udp    111  portmapper
100000    3   udp    111  portmapper
100000    2   udp    111  portmapper
100005    1   udp    892  mountd
100005    1   tcp    892  mountd
100005    2   udp    892  mountd
100005    2   tcp    892  mountd
100005    3   udp    892  mountd
100005    3   tcp    892  mountd
100003    3   tcp   2049  nfs
100003    4   tcp   2049  nfs
100227    3   tcp   2049
100003    3   udp   2049  nfs
100227    3   udp   2049
100021    1   udp  32769  nlockmgr
100021    3   udp  32769  nlockmgr
100021    4   udp  32769  nlockmgr
100021    1   tcp  32803  nlockmgr
100021    3   tcp  32803  nlockmgr
100021    4   tcp  32803  nlockmgr
Ok there we go, we see we have ports 111, 892, 2049, 32803 for TCP and 111, 892, 2049, 32769 for UDP. You should also add 662 if running statd and 3260 for server side copy functionality. Let’s throw these into my firewall script:
# nano -w `which firewall`
New lines:
/sbin/iptables -A INPUT -i br0 -p tcp -s 192.168.1.0/24 -m multiport --dport 111,662,892,2049,3260,32803 -j ACCEPT # localhosts
/sbin/iptables -A INPUT -i br0 -p udp -s 192.168.1.0/24 -m multiport --dport 111,662,892,2049,3260,32769 -j ACCEPT # localhosts
I ran my firewall script to reload the firewall and this granted all the necessary connectivity.
NFS Client Configuration on Windows 10 Pro
Integrating Windows to use NFS is a little more tricky. You may notice I wrote this part of the how-to with screenshots rather than text descriptions. Personally I primarily use Linux for any real systems work beyond spreadsheets and browsing. Actual system administration on Windows is much more of a mystery to me. Clicking around and messing with the registry is not nearly as intuitive. It’s almost like they don’t want you doing this stuff ;-). I figure most of my readers can navigate around Linux. If you landed here from a google search, I similarly assume you know Linux since you picked CentOS for your storage OS. I could have probably skipped the Linux server section entirely and just focused on NFS on Windows 10, but figured I’d hit the major points like permissions and UID/GID matching so that things are little easier to understand.
Login or remote desktop into your Windows 10 system. The first thing you are going to have to do is install NFS services on your machine. As I said I know this is possible on Windows 10 Pro, but I have no idea what other editions support this feature. I imagine Enterprise does, probably not Home.
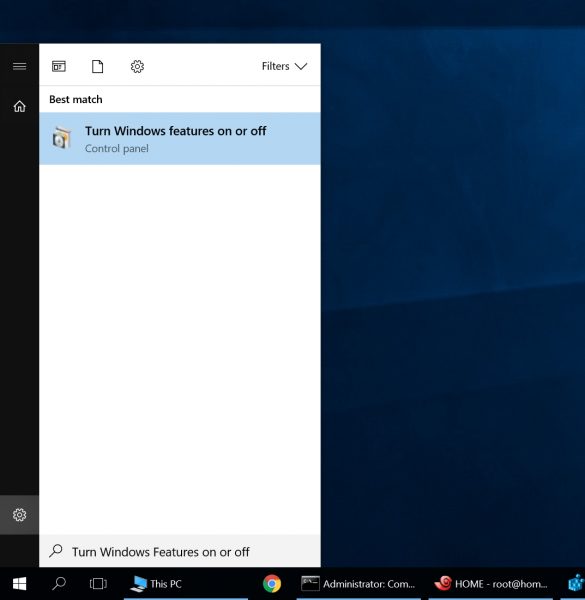
Lets start by typing “Turn Windows features on or off” into the Start menu as shown below. Click on the app and wait for it to launch.
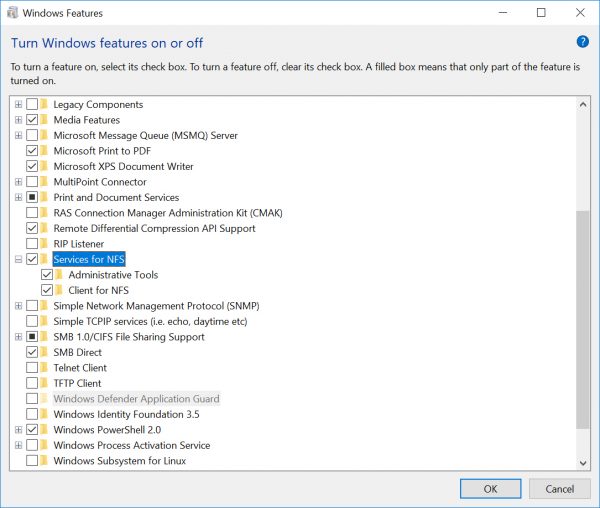
Now scroll down until you find “Services for NFS” and check “Administrative Tools” and “Client for NFS”. If those are not there, it’s possible your edition of Windows 10 does not support these features. Your screen should look like mine below:
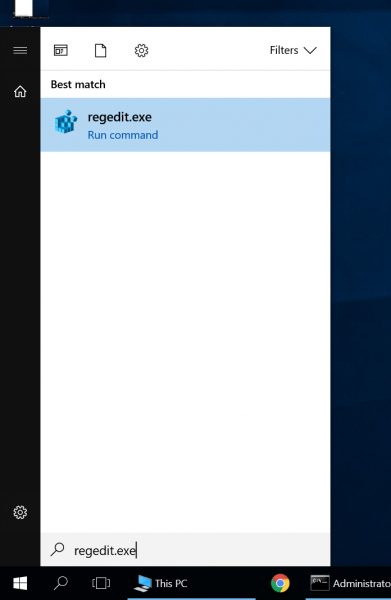
Click OK and Windows should install these tools. Great progress so far, but now things are about to get a little more complicated. You see we need to match the UID and GID that we pulled earlier (1001) on both the Server and the Client. By Default windows will probably use a GID and UID of 2, not 1001 like I need. To change this lets fire up regedit.exe. Just type it into the start menu like you did earlier for the feature app.
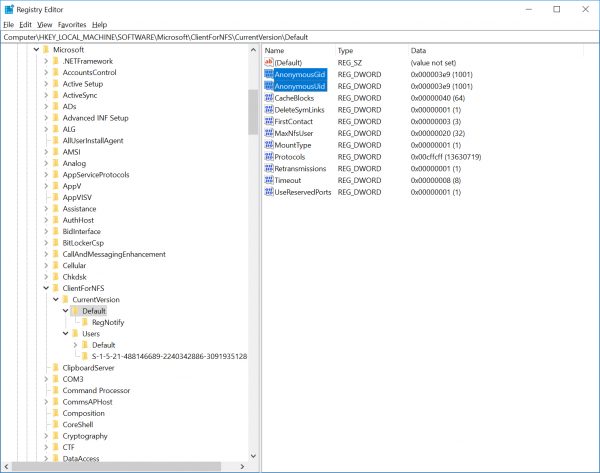
You should be prompted to give regedit.exe permission, just press Yes. Now in regedit we need to make a few changes. First find and open the following key:
HKEY_LOCAL_MACHINE\SOFTWARE\Microsoft\ClientForNFS\CurrentVersion\Default
You will need to make two new “DWORD (32-bit) Value” entries by right clicking inside the Default key. They should be named “AnonymousGid” and “AnonymousUid”. They should both have a decimal value matching your user’s GID and UID that we pulled earlier, in my case that is 1001.
Your final result should look like this:
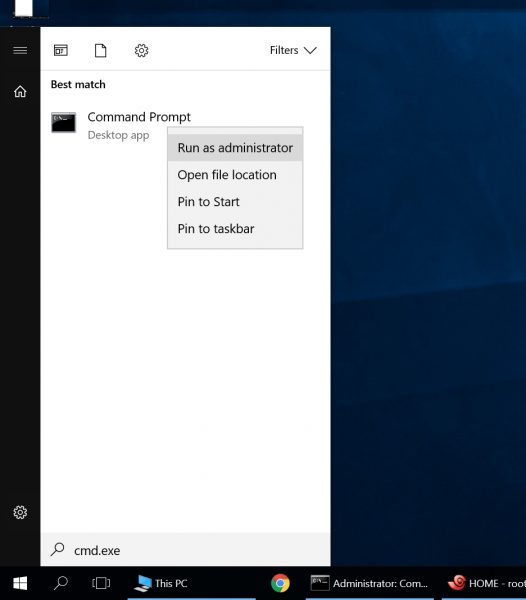
If everything matches up, go ahead and close out of regedit. Now we need to restart the NFS service on the Windows 10 Client side. To do this go back to your start menu and type “cmd.exe”, except this time right click and select “Run as administrator” and click “Yes” once prompted.
In the administrator command line you’re going to need to do three things. First get the hostname of your computer, secondly set case sensitivity to be sensitive (since linux, unlike windows, is case sensitive) and finally restart the NFS client service. Here is how you do it:
C:\Windows\system32>hostname
DESKTOP-AE0D2H0

C:\Windows\System32>nfsadmin client DESKTOP-AE0D2H0 config casesensitive=yes
The settings were successfully updated.

C:\Windows\system32>nfsadmin client DESKTOP-AE0D2H0 stop
The service was stopped successfully.

C:\Windows\system32>nfsadmin client DESKTOP-AE0D2H0 start

The service was started successfully.

C:\Windows\system32>
Now we can go ahead and try to mount our new NFS mount from the command line as a test.
C:\Windows\System32>mount -o anon \\192.168.1.100\home\storage\ Z:
Z: is now successfully connected to \\192.168.1.100\home\storage\

The command completed successfully.

C:\Windows\System32>mount

Local    Remote                                 Properties
-------------------------------------------------------------------------------
Z:       \\192.168.1.100\home\storage\          UID=1001, GID=1001
rsize=1048576, wsize=1048576
mount=soft, timeout=0.8
retry=1, locking=yes
fileaccess=755, lang=ANSI
casesensitive=yes
sec=sys

C:\Windows\System32>
The syntax is pretty simple. We pointed to 192.168.1.100 as the IP address of our CentOS computer. We also pointed it at drive letter (Z:), which you can change if needed. Once you press enter you can follow up with a simple “mount” command to verify things worked.
As you can see we have successfully mounted our NFS export from the CentOS server. However you probably won’t see a drive letter (Z:) in File Explorer. I’m really not sure why, may have something to do with permissions and modern Windows security features. However this doesn’t matter. This is not a persistent mount, it’s a test mount to just see that things work and get better output from the command line vs. the windows button clicking interface.
Let’s go ahead and unmount our Z drive:
C:\Windows\system32>umount -a
You have these active NFS connections:

Z:      \\192.168.1.100\home\storage\
Continuing will cancel the connections.

Do you want to continue this operation? (Y/N) [N]:y

Disconnecting           Z:      \\192.168.1.100\home\storage\
The command completed successfully.

C:\Windows\system32>
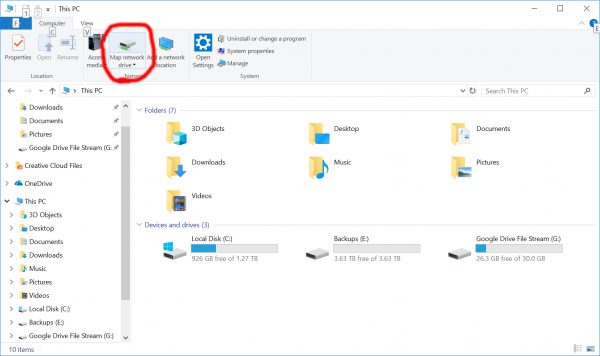
Now we need to mount the drive persistently and actually see it as a drive in File Explorer. This is actually quite simple, just open up File Explorer and navigate to the “This Computer” shortcut. You will see the menu change at the top of File Explorer once you’re in the “This Computer” section. The button “Map network drive” will be visible like in my screenshot below.
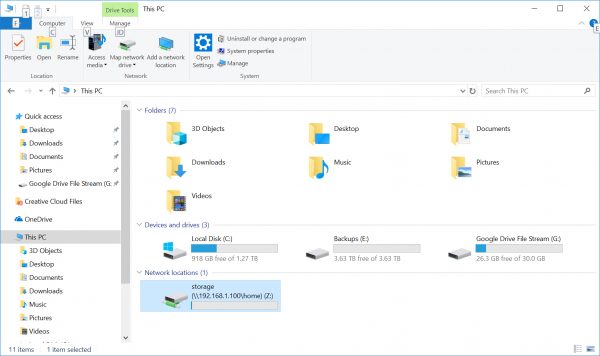
Once you click on “Map network drive” you simply need to type in your share and click “Finish”. You will see the drive has appeared in your File Explorer.

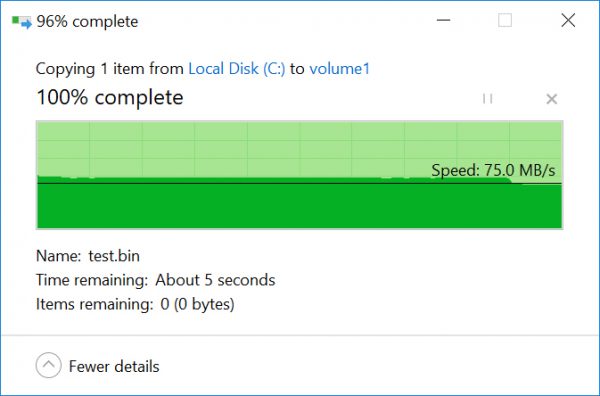
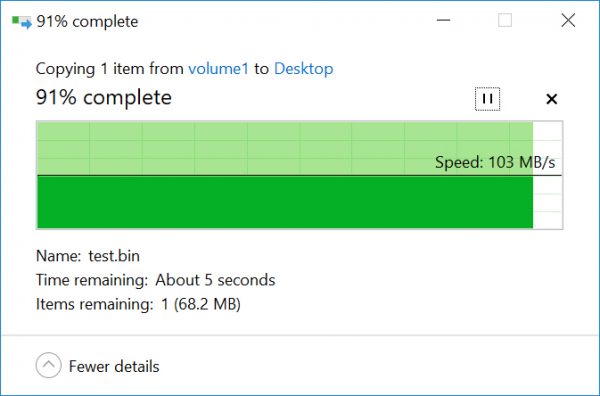
I tested moving an 800MB file to the NFS partition and got pretty good results, around 80MB/s with a small fall off to 75MB/s at the end. This is similar to speeds I see writing to spindles locally. I was writing to the share from a PCIe SSD to ensure I had more bandwidth than the spindles/connection.
Copying from the NFS share (Z:) to the PCIe SSD (C:) was at around 100MB/s which is maxing out the link speed of my network. So far I’m pretty happy.
I’m going to do a few more tests and see how stable/usable NFS is for video editing and other purposes. It’s hard to tell if this is going to be buggy or not on Windows thus far. If it’s buggy you may see a Samba how-to next!

Build your own sound studio in a bag!

1TB Seagate Drive Failure