HOWTO: Compiling, Installing & Configuring Netatalk 3.1.7 on CentOS 6.6 x86_64 for Storage & Time Machine
I’ve struggled to improve Samba (SMB) performance between my Mac Pro (Late 2013) running OS X Yosemite 10.10.2 and my CentOS 6.6 Linux server. The server has a large ZFS share with all my backups and archives as well as various KVM instances running off SSDs. My Mac Pro absolutely must access that ZFS share reliably and it would be nice if my two Mac Books were able to as well. I have a lot of experience with SMB and I’ve never had much trouble working with Linux servers and Windows clients. On OS X however I’ve never had any luck, the connectivity is slow, buggy and generally unreliable.
Tonight I decided to install Netatalk, latest version on my CentOS server from source code. Below is the documentation of the procedure I followed and any outcome I was able to document.
First I wanted to benchmark SMB performance from OS X to the CentOS server running SMB:
Mac-Pro:~ $ dd if=/dev/urandom of=~/testfile bs=4k count=100000
100000+0 records in
100000+0 records out
409600000 bytes transferred in 25.887503 secs (15822306 bytes/sec)
Mac-Pro:~ $ rsync -avP testfile /Volumes/storage-1/
building file list ...
1 file to consider
testfile
   409600000 100%   17.31MB/s    0:00:22 (xfer#1, to-check=0/1)

sent 409650131 bytes  received 42 bytes  17431922.26 bytes/sec
total size is 409600000  speedup is 1.00
Mac-Pro:~ $
That’s not very impressive, just 17.3MB/s, let’s see what we get if we rsync over SSH instead of SMB.
Mac-Pro:~ $ rsync -avP testfile [email protected]:/storage/
building file list ...
1 file to consider
testfile
   409600000 100%   38.66MB/s    0:00:10 (xfer#1, to-check=0/1)

sent 409650131 bytes  received 42 bytes  39014302.19 bytes/sec
total size is 409600000  speedup is 1.00
Mac-Pro:~ $
As you can see I more than double my performance by using SSH instead of Samba, 38.7MB/s vs 17.3MB/s, 10 seconds vs. 22 seconds. Imagine working with many large files over this SMB share and then consider that it’s also unresponsive between interactions adding more seconds of delay each time it’s accessed. Now you feel my pain.
I did a little research and it seems Apple has something called AFP, which is apparently it’s native file sharing. AFP stands for Apple Filing Protocol and it’s non-proprietary linux version is called Netatalk. Sounds promising, lets go to their download page and snag the latest copy (3.1.7 as of 03/2015), direct link to Netatalk 3.1.7.
First we need some prerequisites installed:
yum groupinstall "Development Tools"
yum install db4-devel libacl-devel avahi-devel libgcrypt-devel pam-devel psiconv-devel dbus-devel dbus-c++-devel globus-gssapi-gsi-devel cracklib-devel libtdb-devel libevent-devel tcp_wrappers-devel libcddb-devel libdbi-devel mysql-devel openldap-devel systemtap-sdt-devel dbus-glib-devel
Now we’re ready to download Netatalk and compile it.
wget http://iweb.dl.sourceforge.net/project/netatalk/netatalk/3.1.7/netatalk-3.1.7.tar.bz2
tar xvjpf netatalk-3.1.7.tar.bz2
cd netatalk-3.1.7
./configure --with-init-style=redhat-sysv --without-tdb --with-cracklib --enable-krbV-uam --with-pam-confdir=/etc/pam.d --with-dbus-sysconf-dir=/etc/dbus-1/system.d
make
make install
cd ~
afpd -V
You should see this:
          AFP versions:	2.2 3.0 3.1 3.2 3.3 3.4
         CNID backends:	dbd last tdb mysql
      Zeroconf support:	Avahi
  TCP wrappers support:	Yes
         Quota support:	No
   Admin group support:	Yes
    Valid shell checks:	Yes
      cracklib support:	Yes
            EA support:	ad | sys
           ACL support:	Yes
          LDAP support:	Yes
         D-Bus support:	Yes
     Spotlight support:	No
         DTrace probes:	Yes

              afp.conf:	/usr/local/etc/afp.conf
           extmap.conf:	/usr/local/etc/extmap.conf
       state directory:	/usr/local/var/netatalk/
    afp_signature.conf:	/usr/local/var/netatalk/afp_signature.conf
      afp_voluuid.conf:	/usr/local/var/netatalk/afp_voluuid.conf
       UAM search path:	/usr/local/lib/netatalk//
  Server messages path:	/usr/local/var/netatalk/msg/
Now I edited the config file output earlier:
nano -w /usr/local/etc/afp.conf
Here was what I came up with:
[Global]

[storage]
 path = /storage
 valid users = storage
 umask = 0077
This assumes that you have a user called “storage” and you want to have a share called “storage” which is mounted as /storage on your server system, as it is on my ZFS storage server. You should also “chmod” and “chown” the /storage structure appropriately for the “storage” user. On my system it went like this:
useradd storage -d /storage
passwd storage
chmod -Rv 700 /storage
chown -Rv storage. /storage
I also had to add some firewall entries:
/sbin/iptables -A INPUT -i br0 -p tcp -s 192.168.1.0/24 --dport 548 -j ACCEPT
/sbin/iptables -A INPUT -i br0 -p udp -s 192.168.1.0/24 --dport 548 -j ACCEPT
/sbin/iptables -A INPUT -i br0 -p tcp -s 192.168.1.0/24 --dport 5353 -j ACCEPT
/sbin/iptables -A INPUT -i br0 -p udp -s 192.168.1.0/24 --dport 5353 -j ACCEPT
After I reloaded my firewall I launched the necessary services to start sharing files between my CentOS ZFS file server and my Mac Pro:
chkconfig avahi-daemon on
service avahi-daemon start
chkconfig netatalk on
service netatalk start
Now from my Mac Pro I was able to immediately see a share called “home” in Finder. When I clicked it in Finder I saw I could do “Connect As…”, I played with that first and it works just fine. In my case I connected with the username “storage” and the password I set for the storage user earlier.
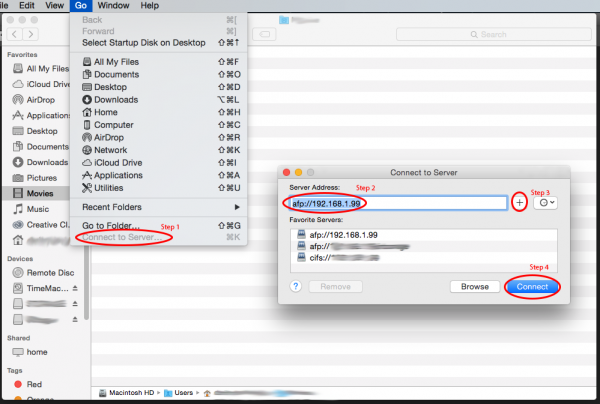
Another option is to use the “Go -> Connect to Server” menu option (Shortcut: Apple + K) which brings up a connection screen. There I typed in “afp://192.168.1.99” as the server and then clicked the + button to save the share to favorites. Upon attempting to connect you will be prompted to enter a username/password just as with the “Connect As…” button you will use the info you setup earlier, in my case “storage” and my password. Now you can use Apple + K or “Go -> Connect to Server” whenever you want to mount this share. This is my preferred method.
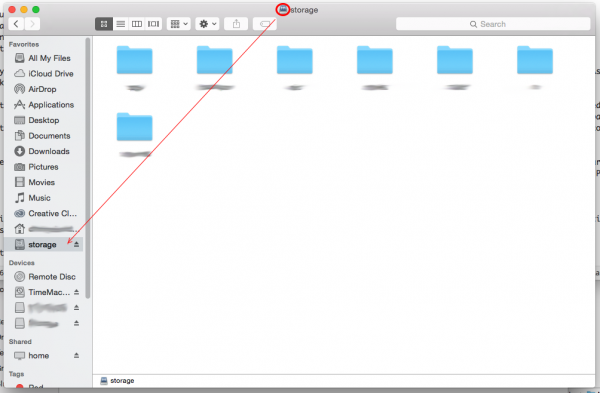
Once you’re in the new share you should look at the title bar of the Finder window and drag the little disk icon from the middle of the bar somewhere into your favorites bar in the left. That will give you a bookmark to your new share, so you don’t have to keep reconnecting to it whenever you close Finder.
From the first few moments of playing with this new share I could tell it was very responsive. The several seconds of lag between interactions and results was gone. I was able to instantly delete files and move them around, no progress bars, no spinning beachballs of doom. From some testing I still wasn’t able to achieve rsync over SSH level speeds through rsync via Netatalk, but so far it’s a MUCH more stable connection. It’s nearly instentaneously responsive and I don’t get choppy or sine-wave throughput to my data like I did with SMB. Here was my average run:
Mac-Pro:~ $ rsync -avP testfile /Volumes/storage-1/
building file list ...
1 file to consider
testfile
   409600000 100%   22.42MB/s    0:00:17 (xfer#1, to-check=0/1)

sent 409650131 bytes  received 42 bytes  22143252.59 bytes/sec
total size is 409600000  speedup is 1.00
Mac-Pro:~ $
So as you can see its about 5MB/s and 5 seconds faster than SMB. I will continue tuning and see if I can squeeze out more performance. I will also update this article if I find any other useful information such as long term reliability/durability of the service.
Update 03/02/2015 – Using AFP For Time Machine Shares
Up until now I’ve been using external disks for time machine with my MacPro and when docking my MacBook Pros. Last night I decided to try doing Time Machine to AFP so I can get rid of the external disk from the MacPro and have my MacBooks backup automatically when they’re home. I created two shares to start with, one for my MacPro and one for my main MacBook, here is how I did it:
nano -w /usr/local/etc/afp.conf
Here are the changes I made to the config file:
[Global]

[storage]
 path = /storage
 valid users = storage
 umask = 0077

[tm_macbook]
 path = /tm_macbook
 valid users = storage
 umask = 0077
 time machine = yes

[tm_macpro]
 path = /tm_macpro
 valid users = storage
 umask = 0077
 time machine = yes
As you can see the two shares are called “tm_macbook” and “tm_macpro” with the same storage user added to both and “time machine” variable set to “yes”. The reason for the shares using the same user account is so that “storage” and the relevant “tm_” share can be accessed at the same time by OS X. I initially created new user accounts for Time Machine, however I found that I couldn’t get OS X to connect to the share server under two logins at the same time.
After the config is loaded you simply need to do a service restart, note you will get disconnected from AFP:
service netatalk restart
After its back online you will want to reconnect to AFP and then go to Time Machine and click “Select Disk…” If you’re connected to AFP you should see the new share you created, in my case “tm_macpro”. Select the share and watch her rip!

Understanding suPHP Permissions – Why am I getting 500 Internal Server Error?
FFmpeg: DNxHD & DNxHR MXF Proxies and Optimized Media